Using CLS Document Service
The CLS Document Service is an executable that can be used to automate the process of uploading documents and associating them with the appropriate samples, workorders, etc., in The CLS Document. The CLS Document Service can parse content from PDF documents, or use file naming conventions to link to the correct entity. You can use this utility to upload any type of document.
Note: This section includes steps for running
the CLS_document_service executable through the command line.
You can, however, automate that process by scheduling CLS_document_service.exe
to run on a frequent basis through Monitor![]() CLS's background task manager. It manages jobs submitted to the job queue. or through Windows Task Scheduler.
This allows you to leave the process unattended.
CLS's background task manager. It manages jobs submitted to the job queue. or through Windows Task Scheduler.
This allows you to leave the process unattended.
See: Parsing PDF Files for information about parsing content from PDF documents using CLS Document Service.
To use the CLS Document Service, complete the following steps:
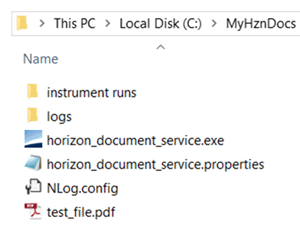
- Identify a folder that will contain the files that you want to push into the CLS Document repository. This example uses the folder "MyHznDocs". CLS Document Services may run on any workstation or on CLS application server, and multiple copies of the executable can run simultaneously as long as each one processes a unique folder.
-
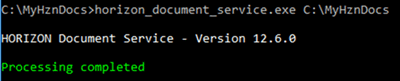
Copy the CLS_document_service.exe and NLog.config files from [CLS_HOME]\Install\DocumentService\ on your application server to the folder you have identified. You can execute the program from a CMD prompt as follows:

- A properties file is required. The properties file is named “CLS_document_service.properties”
and must be in the same folder as the executable.
The properties file can be edited in Notepad.
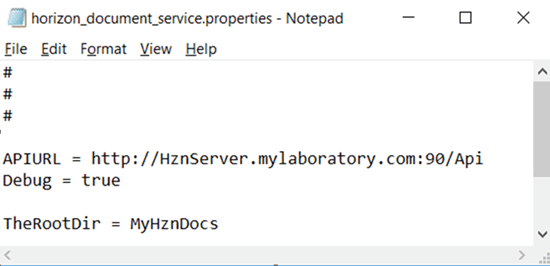
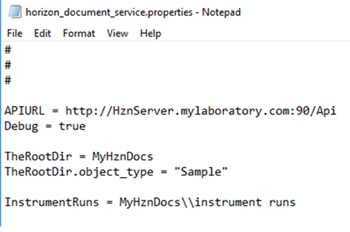
The CLS_document_service.properties file must, at a minimum, contain the following information:
- APIURL
- Instructions for processing at least one folder
APIURL is the location of CLS API, which provides the database connection for CLS_document_service. To determine this, concatenate
the System Installation settings APISRVR and APIPORT, then add “/Api”.
For these examples, APISRVR is “HznServer.mylaboratory.com” and APIPORT
is “90”. The CLS Installer creates these settings in Rules Engine![]() The graphical CLS interface for configuring the LIMS, specifically the Control Tables.
for you.
The graphical CLS interface for configuring the LIMS, specifically the Control Tables.
for you.
For each folder that is going to contain files, you must create an entry in CLS_document_service.properties that names that folder. This includes the root/working folder if the root folder will contain files that need to be processed. If the working folder is not going to contain files and only the sub-folders will contain files, then the working folder does not need to be explicitly identified in the properties file.
The following example includes an entry for the root folder “MyHznDocs” and a sub-folder called “instrument runs”. The sub-folder must be fully qualified from the working folder, and the backslash character must be prefixed by a backslash (as do all special characters that may appear in the properties file).
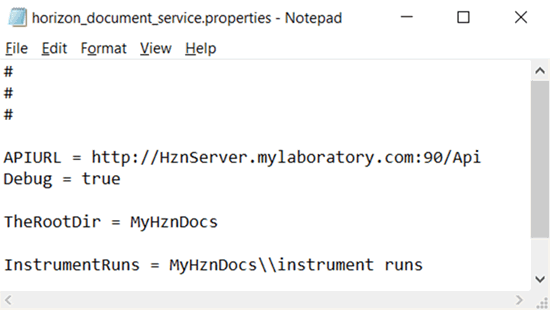
The names assigned to the two folders (i.e., TheRootDir and InstrumentRuns) have no inherent meaning. They are just a means to identify the folders and will be used later to identify other attributes about the folders.
The CLP_document_service.properties file gives CLS Document Service information to process files in the folders. In this example, the two folders that will be processed are “MyHznDocs” and “instrument runs”.
Execute the CLS_document_service.exe file again.
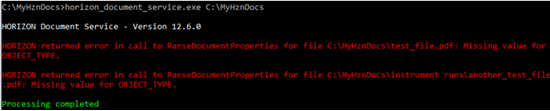
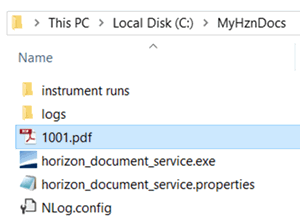
The CLS Document Service finds files in those two folders. However, it does not know how to handle the documents contained within them.

Each time CLS Document Service executes, it will create a log file in a logs folder under the working folder. One log file is created per day by default (modify the rules in the NLog.config file if you want to change this). It will contain error messages for all files in the working folder and any sub-folders that are processed. This gives you a single place to look for all errors for this instance of CLS_document_service. Including “Debug = true” in the CLS_document_service.properties file will add additional messages that can be useful for troubleshooting issues.
The error log explains why test_file.pdf failed:

Test_file.pdf failed because CLS Document Service was unable to determine OBJECT_TYPE. For a file to be pushed into the CLS Document file repository, CLS Document Service must be able to identify the OBJECT_TYPE and OBJECT_ID for each incoming file so that it knows to which entity the document should be attached.
The CLS_document_service.properties file is used to help CLS Document Service identify OBJECT_TYPE and OBJECT_ID. There are many ways to accomplish this.
Example
The following example assigns the OBJECT_TYPE of “SAMPLE” to all files found in the RootDir “MyHznDocs”.
OBJECT_TYPE is only half of what CLS Document Service is looking for. The file still fails because the Object ID has not been identified.

We can use the file name of a .pdf file to identify the Object ID. If
we want to link the file to HSN![]() CLS Sample Number. This is a unique, permanent, sequential identifier that CLS assigns to each received sample. HSNs can never be changed or deleted as they form the basis for the audit trail. 1001, then we can rename test_file.pdf
to 1001.pdf.
CLS Sample Number. This is a unique, permanent, sequential identifier that CLS assigns to each received sample. HSNs can never be changed or deleted as they form the basis for the audit trail. 1001, then we can rename test_file.pdf
to 1001.pdf.
The CLS_document_service.properties file will have to include the command to assign the filename to object_id. The special tag [FILENAME] will accomplish this. The special tag [DIR] is also available to pull the folder name.
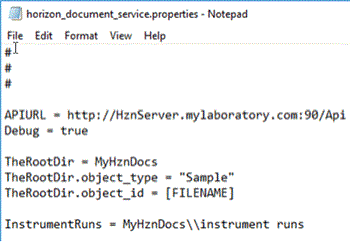
Now CLS Document Service will link file 1001.pdf to HSN 1001, move the file into the CLS Document repository, and delete the original file.
To check if it worked, make sure the following steps have been completed:
- The original file is deleted.
- The sample has a document attached. Use the Documents > Sample
 The material to be tested. The sample always has one matrix, from a specific site or location, and collected on a specific date/time (or a sampling interval such as for a composite environmental sample or a tuberculosis test). Document List option from the Actions menu of the Sample Details page to verify. Click the Preview button to view the document.
The following command line switches are available with CLS Document Service.
|
-a |
This means “process all files”. CLS Document Service will strip the 'ERROR_' prefix off all files before processing. This allows you to make modifications to the CLS_document_service.properties file and reapply it to files that previously failed to link. |
|
-v |
This means “verbose”. In addition to logging errors, CLS Document Service will create a much more verbose log file that may be useful in debugging linking issues. |
|
-t |
This means “test”. CLS Document Service will process the files but will not delete them or create links in CLS. |
Note: The –a, -v, and –t command switches all produce log files; however, the –v switch produces much more detail in the file. To turn on debug logging, set Debug = true in the CLS_document_service.properties file.
See Also: